
Spring's Science Potential
Spring is a natural time for preschoolers to explore the world around them. Their curiosity is high, making it a perfect season for simple science activities. Young children are already experimenting and asking 'why' about everything they see.
You don't need fancy labs or expensive gear to introduce STEM concepts. The most impactful learning often comes from everyday materials. These activities focus on building problem-solving skills, encouraging observation, and fostering a love of learning, not on creating future scientists.
The experiments use common household materials and are adaptable for different skill levels. Learning alongside your child can be a rewarding experience.
12 Spring STEM Activities
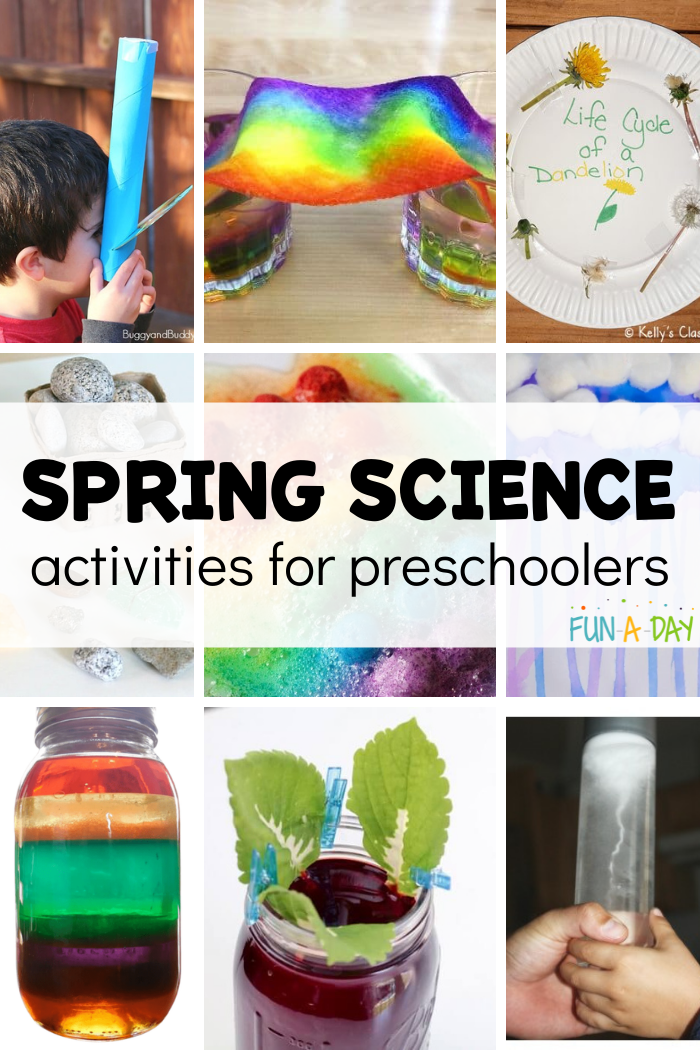
Here are 12 spring-themed science activities for preschoolers, each offering a chance to explore, discover, and learn through play.
1. Planting Seeds & Observing Growth: Provide small pots, soil, and fast-growing seeds like beans or radishes. Have children plant the seeds and observe the changes over time. This illustrates the life cycle of a plant and the importance of water and sunlight. A variation could be to plant different types of seeds and compare growth rates.
2. Rainbow Density Tower: Layer liquids of different densities (honey, corn syrup, dish soap, water, oil, rubbing alcohol) in a clear glass. Children can observe how the liquids separate and form distinct layers. This demonstrates the concept of density in a visually appealing way. Add food coloring to the water for a brighter rainbow effect.
3. Butterfly Life Cycle Exploration: Use pictures or models to illustrate the four stages of a butterfly’s life. Talk about what happens at each stage and how butterflies change over time. You could even raise butterflies from caterpillars, observing their transformation firsthand (ensure responsible release afterwards).
4. Rain Gauge Creation: Help children create a simple rain gauge using a plastic bottle and a ruler. Place it outside and measure the amount of rainfall over a period of time. This introduces basic measurement skills and helps them understand weather patterns.
5. Bird Feeder Building: Construct a simple bird feeder using a pinecone, peanut butter, and birdseed. Observe the different types of birds that visit the feeder and discuss their feeding habits. This activity combines science with a love for nature.
6. Baking Soda & Vinegar "Volcano" (Spring Edition): Build a small 'flower' out of clay or paper mache around a small container. Add baking soda, then pour in vinegar to create an eruption. This classic experiment demonstrates a chemical reaction, and the spring theme adds a fun twist.
7. Leaf Rubbings: Collect leaves of different shapes and textures. Place them under a piece of paper and rub over them with crayons to create beautiful leaf rubbings. This activity explores the structure of leaves and encourages artistic expression. The Georgia Department of Early Care and Learning’s Pre-K Science Activities guide references this as a way to study leaf structure (decal.ga.gov).
8. Flower Color Mixing: Separate the petals from different colored flowers (red, yellow, blue). Place each color in a separate container with a little water and let them sit for a while. Then, use droppers to mix the colored water and observe how new colors are created.
9. Muddy Investigations: Let children play with mud and explore its properties. What happens when you add water? What happens when you let it dry? What creatures might live in the mud? This encourages sensory exploration and observation.
10. Miniature Ecosystem in a Jar: Create a small ecosystem in a jar using soil, plants, and small insects (like worms). Observe how the different components interact and support each other. This introduces the concept of ecosystems and the interdependence of living things.
11. Worm Observation: Observe worms in their natural habitat. What do they eat? How do they move? What role do they play in the ecosystem? This can be a surprisingly fascinating activity for preschoolers. It's a good idea to provide a safe and contained environment for observation.
12. Homemade Wind Vane: Construct a simple wind vane using cardboard, a straw, and a pointer. Observe how the wind vane rotates to indicate the direction of the wind. This introduces basic weather concepts and encourages observation skills.
Blooming Colors & Mixing
The flower color mixing activity is a wonderful way to introduce the concept of primary and secondary colors. Explain that red, yellow, and blue are primary colors – they can’t be made by mixing other colors. When you mix two primary colors, you get a secondary color: red and yellow make orange, yellow and blue make green, and blue and red make purple.
Extracting pigments from flower petals is a fascinating process. The water acts as a solvent, dissolving the colored compounds in the petals. This demonstrates how things can change and interact. Using droppers to mix the colors also helps develop fine motor skills and hand-eye coordination. It's a surprisingly precise activity for little hands.
Bright Horizons suggests this as a great way to explore color and creativity (brighthorizons.com). Encourage children to experiment with different combinations and observe the results. Don't be afraid to let them get messy – that's part of the learning process! This activity isn't just about colors; it's about observation, experimentation, and creativity.
Muddy Investigations
Mud is a fantastic material for sensory exploration. It’s a wonderful way for preschoolers to explore different states of matter – solid, liquid, and somewhere in between! When mud is dry, it's solid and crumbly. Add water, and it becomes more liquid and pliable. The amount of water dramatically changes the texture.
Encourage children to experiment with adding different amounts of water to the mud. What happens when you add a little water? A lot of water? This helps them understand the relationship between water and the consistency of mud. It’s also a great opportunity to talk about how mud provides a habitat for worms and other creatures.
MyBrightWheel points out that even simple mud play can be educational (mybrightwheel.com). While it might be tempting to steer clear of the mess, mud play offers valuable learning experiences. Just be prepared for some dirty hands and clothes!
Butterfly Life Cycle Deep Dive
The transformation of a butterfly is a remarkable process, and a fascinating topic for preschoolers. The life cycle has four distinct stages: egg, larva (caterpillar), pupa (chrysalis), and adult butterfly. Each stage is dramatically different from the last.
The egg is typically laid on a leaf, and the caterpillar hatches from the egg and spends its time eating and growing. The caterpillar then forms a chrysalis, a protective shell where it undergoes metamorphosis. Finally, the adult butterfly emerges from the chrysalis, ready to fly and reproduce.
Butterflies are also important pollinators, helping to transfer pollen from one flower to another, which is essential for plant reproduction. Raising butterflies at home can be a rewarding experience, but it’s important to do it responsibly. Ensure you have a suitable habitat and release the butterflies in a safe environment. Observing this process requires patience and careful attention to detail.
Seed Starting & Plant Growth
Planting seeds is more than just putting them in the ground. Seeds need specific conditions to germinate and grow. They need water to activate the process, sunlight to provide energy, and soil to provide nutrients. Understanding these basic needs is a fundamental concept in plant science.
Different types of seeds grow into different types of plants. A tiny sunflower seed will grow into a towering sunflower, while a small bean seed will produce a bean plant. Discussing the different types of seeds and what plants they grow into can expand a child’s understanding of the plant world.
Germination is the process by which a seed sprouts and begins to grow. It's a complex process that involves the seed absorbing water, breaking dormancy, and sending out roots and shoots. A simple timeline can help illustrate the stages of plant growth: seed, sprout, seedling, mature plant. Consistent care, including watering and providing sunlight, is essential for healthy plant growth.
Safety First: Experiment Guidelines
Safety is paramount when conducting science experiments with preschoolers. Adult supervision is absolutely essential for all activities. Ensure that all materials used are non-toxic and appropriate for young children. Be aware of potential allergies and sensitivities.
For the baking soda and vinegar volcano, supervise the mixing of ingredients closely. While generally safe, it can create a bit of a mess and the reaction can be surprising. When working with water, be mindful of slippery surfaces. For the mud experiment, ensure children wash their hands thoroughly afterwards.
Always discuss safety rules with the children before starting an experiment. Explain why certain precautions are necessary. A calm and controlled environment will help minimize risks and maximize learning. Remind them not to taste any materials, even if they look or smell appealing.
Adapting for Different Learners
Every child learns differently. It's important to adapt the experiments to suit individual learning styles and abilities. For younger children or those who need more support, simplify the activities. For example, with the rainbow density tower, you can pre-layer the liquids and let them observe. With the planting seeds activity, you can help them with the planting process.
For more advanced learners, add challenges. Encourage them to ask questions and explore different variables. For example, with the butterfly life cycle activity, they could research different types of butterflies. With the wind vane, they could test how different shapes of vanes affect its performance.
Incorporate sensory experiences and opportunities for creativity. Let children explore the materials with their hands, and encourage them to express their learning through art, music, or storytelling. Remember, the goal is to foster a love of learning, and there's no 'right' or 'wrong' way to do these experiments as long as children are exploring and discovering.

No comments yet. Be the first to share your thoughts!